
A plain ceiling can make even a beautiful room feel unfinished. A flat coffered ceiling changes that feeling without making the space look heavy, old-fashioned, or overly formal.
The idea matters because ceilings quietly control how a room feels. They affect scale, light, mood, and even how “complete” a design looks. When the ceiling is ignored, furniture and paint have to do all the work. When it is planned well, the whole room feels calmer and more intentional.
Many people hear “coffered ceiling” and picture deep wooden boxes in a mansion. In reality, today’s flatter versions can work in normal homes, apartments, renovations, and builder-grade rooms. The secret is using shallow beams, careful spacing, and a finish that supports the rest of the room.
This guide walks through design choices, room suitability, cost, lighting, materials, mistakes, and practical examples. By the end, you should know whether this ceiling style fits your space and how to plan it without wasting money.
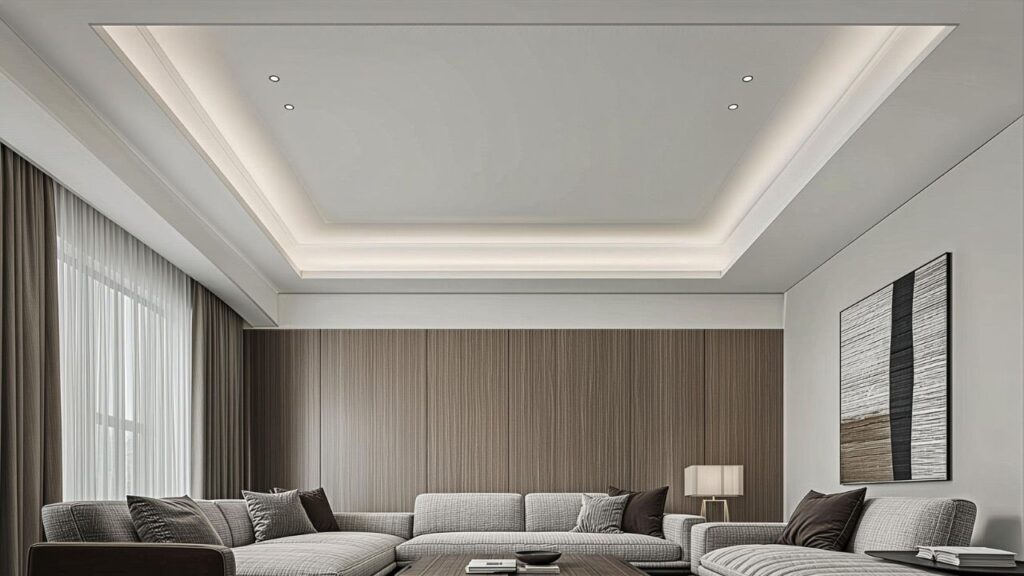
Table of Contents
- What Is a Flat Coffered Ceiling?
- Why This Ceiling Style Feels So Polished
- Best Rooms for This Ceiling Detail
- Design Rules That Make the Ceiling Look Right
- Layout Ideas for Different Home Styles
- Materials and Finishes
- Lighting Ideas That Work Beautifully
- Cost, Budget, and Installation Planning
- DIY vs Professional Installation
- Common Mistakes to Avoid
- Maintenance and Long-Term Value
- FAQs
- Conclusion
What Is a Flat Coffered Ceiling?
A coffered ceiling is a ceiling design made from recessed panels framed by beams, trim, or molding. Traditional versions often have deep recesses, while a flat coffered ceiling keeps the profile shallower and cleaner. That smaller drop makes it easier to use in homes with standard ceiling heights.
Think of it as a quiet grid on the ceiling rather than a dramatic carved structure. The panels may be square, rectangular, or slightly elongated. The beams can be painted the same color as the ceiling, stained wood, or finished in a soft contrast.
Architectural references often describe coffered ceilings as repeated sunken panels framed by beams, and several design sources trace the style back to classical architecture, including Greek and Roman buildings.
The “flat” part is what makes this version feel current. Instead of making the ceiling look lower, the trim sits close to the surface. The result is more architectural than decorative. It can make a plain room look designed, but it does not shout for attention.
Why This Ceiling Style Feels So Polished
Ceilings are large surfaces. In a typical room, they may be one of the biggest uninterrupted planes, yet they are often painted white and forgotten. A coffered layout breaks that blank surface into smaller, more pleasing sections.
The visual effect is similar to paneling on a wall. It gives the eye a rhythm. In a living room, that rhythm can make sofas, rugs, and lighting feel more connected. In a dining room, it can turn a simple table into the center of a more graceful setting.
A flat coffered ceiling also adds shadow without clutter. Even a shallow beam creates a fine edge where light changes slightly. That edge gives the ceiling depth, which is why the room can feel richer even when the color palette stays simple.
There is also an emotional side. People often describe rooms with ceiling detail as “finished,” “custom,” or “warm.” Those words matter because a home is not only about resale value. It is about walking into a room and feeling that someone cared about the space.
Best Rooms for This Ceiling Detail
Not every room needs ceiling drama. The best rooms are usually the ones where people gather, sit for longer periods, or look upward naturally.
Living Rooms
A living room is often the safest place for this design. The ceiling detail can help define the seating area, especially in open-plan homes where the living room shares space with a kitchen or dining area.
For a relaxed look, keep the beam depth modest and use the same paint color across the whole ceiling. For a more tailored look, add crown molding inside each panel.
Dining Rooms
Dining rooms love ceiling detail because the table already creates a strong center point. A coffered grid can frame that center and make a chandelier feel more anchored.
If the room is narrow, use rectangular panels that follow the room’s length. This helps the ceiling feel balanced instead of chopped into small boxes.
Bedrooms
A bedroom can handle a softer version. Use fewer panels, thinner trim, and a calm color. A shallow coffered ceiling over the bed area can feel peaceful, almost like a tailored canopy.
Avoid heavy contrast in smaller bedrooms. Dark beams on a low ceiling may feel cozy to some people, but they can also feel visually crowded.
Kitchens
Kitchens need more planning because of cabinets, vents, pendant lights, and recessed lighting. Still, a shallow coffer can work beautifully above an island or breakfast area.
The trick is alignment. If the beams fight the cabinet lines or island placement, the whole kitchen can look slightly “off,” even if the materials are expensive.
Home Offices
A home office is a smart place for a restrained ceiling design. It can make video-call backgrounds feel more professional and give a small room a sense of purpose.
Choose a matte finish to avoid glare. This is especially useful if you have task lighting, screens, or glossy furniture.
Design Rules That Make the Ceiling Look Right
The ceiling should feel connected to the room below it. That sounds obvious, but many ceiling projects fail because the grid is designed in isolation.
Start With Ceiling Height
Height is the first question. A shallow coffer can work in many rooms, but you still need enough finished headroom. The 2024 IRC commentary states that habitable spaces and hallways commonly require a 7-foot minimum ceiling height, while other basement areas may be lower depending on use and local rules.
For comfort, many designers prefer taller rooms for deeper coffers. That does not mean an 8-foot ceiling is impossible. It means the beam depth must be modest, often closer to trimwork than bulky framing.
A simple rule: if the room already feels low, keep the beams thin, paint everything one color, and avoid dark borders.
Match the Grid to the Room Shape
A square room can use square panels. A long room usually looks better with rectangular panels. A wide open space may need larger coffers so the ceiling does not look busy.
Measure the full room, then subtract areas interrupted by bulkheads, fireplaces, large openings, or built-ins. The best grid is rarely based on random equal squares. It is based on what the room actually gives you.
Respect Windows, Doors, and Main Furniture
The ceiling grid should relate to the strongest lines in the room. These may include:
- The center of a fireplace
- The dining table
- The kitchen island
- The main sofa wall
- Large windows or French doors
- A central chandelier
If the beam layout misses those lines by a few inches, the mistake can feel surprisingly noticeable. This is why careful measuring matters more than expensive trim.
Keep the Beam Profile Simple
This flatter ceiling style usually looks best with a clean beam profile. Too many stacked moldings can make it feel fussy.
For modern homes, a square-edge beam or simple stepped trim often works well. For transitional homes, a small crown detail can soften the grid. For traditional homes, deeper molding may be appropriate, but it still needs proportion.
Choose the Right Panel Size
Tiny panels can make a room feel nervous. Oversized panels can look unfinished. Most rooms need a middle ground.
Here is a simple planning table:
| Room Type | Better Panel Shape | Best Visual Goal |
|---|---|---|
| Small bedroom | Larger rectangles | Calm and open |
| Formal dining room | Centered squares or rectangles | Symmetry and elegance |
| Long living room | Repeated rectangles | Flow and balance |
| Open-plan area | Larger grouped panels | Zone definition |
| Home office | Simple square grid | Order and focus |
Layout Ideas for Different Home Styles
The same ceiling idea can look very different depending on material, color, and spacing. Match the grid to the style of the room instead of copying a photo.
| Home Style | Ceiling Direction | Why It Works |
|---|---|---|
| Modern minimal | Same-color beams and panels, square edges | Adds structure without visual noise |
| Warm transitional | Soft white trim, light molding, warm neutrals | Feels refined but still relaxed |
| Farmhouse soft | Painted wood trim, muted colors, wider panels | Adds charm without becoming rustic-heavy |
| Coastal airy | Wide grid, pale tones, breezy finishes | Keeps the room light and open |
| Classic formal | Deeper panels, richer color, elegant molding | Creates a moodier, more tailored room |
Materials and Finishes
Material affects cost, weight, installation time, and maintenance.
| Material | Best Use | Notes |
|---|---|---|
| MDF | Painted trim grids | Smooth and budget-friendly, but not ideal for damp rooms |
| Solid wood | Stained or premium ceilings | Warm and durable, though cost and movement can be higher |
| Drywall | Seamless built-in coffers | Clean look, but crisp finishing needs skill |
| Lightweight faux beams | Decorative beams with less weight | Choose carefully so the finish does not look plastic |
Flat or matte paint hides small flaws better than glossy paint. For most homes, one ceiling color across beams and panels is the safest choice because it keeps the detail quiet and helps the room feel taller.
Lighting Ideas That Work Beautifully
Lighting can make or break this ceiling. The grid creates lines, and fixtures need to respect those lines.
Recessed Lights
Recessed lights should usually sit inside panels, not half on a beam and half off. Poor placement can make even a well-built ceiling look careless.
Plan the lighting before the trim is installed. It is much easier to shift a layout on paper than after wiring and framing are done.
Chandeliers and Pendants
A dining room chandelier should sit in the visual center of the table and the ceiling layout. If the table is not centered in the room, design the ceiling around the table, not the empty room.
In kitchens, pendant lights over an island should align with both the island and the ceiling beams. This is one of the most common places where small layout mistakes show.
LED Cove or Strip Lighting
Hidden LED lighting can add a soft glow, but use it carefully. This ceiling style is usually meant to look refined, not like a nightclub ceiling.
Warm white light often feels better in homes than cool white. It flatters wood, paint, skin tones, and evening moods.
Natural Light
Sunlight reveals imperfections. If the room has large windows, pay close attention to seams, paint finish, and caulk lines.
A shallow design can be more forgiving than a deep one because it creates less harsh shadow.
Infographic: Flat coffered ceiling planning checklist showing five steps: measure finished ceiling height, choose grid direction, align with main furniture, plan lights, select beam depth and finish.
Cost, Budget, and Installation Planning
Costs vary widely because every room is different. Room size, beam depth, material, electrician work, ceiling repairs, and finish level all affect the final number.
Current home-improvement cost guides show a wide range. HomeAdvisor lists coffered ceilings at about $20 to $30 per square foot, with many projects ranging from $2,200 to $6,720 depending on size, materials, and complexity. Another HomeAdvisor ceiling guide lists coffered ceilings at about $18 to $32 per square foot. Angi separately notes that labor, materials, framing, and decorative add-ons can raise the total, especially when lighting or trim details are added.
Because estimates vary so much, treat online numbers as a starting point, not a final quote. A simple painted grid in a square room may be fairly predictable. A ceiling with odd corners, vents, lighting changes, and premium wood can climb quickly.
Here is a practical budget table:
| Budget Factor | Lower-Cost Choice | Higher-Cost Choice |
|---|---|---|
| Material | MDF or simple painted trim | Stained wood or detailed millwork |
| Layout | Basic rectangle or square grid | Custom pattern with varied panels |
| Lighting | Existing central fixture | New recessed lights, pendants, or LEDs |
| Labor | Straight, accessible ceiling | Repairs, leveling, complex corners |
| Finish | One paint color | Multi-color, stain, wallpaper, or specialty finish |
Hidden Costs to Watch
The visible trim is only part of the budget. You may also need:
- Ceiling repair before installation
- Electrical changes
- Paint for the full ceiling
- Crown molding adjustments
- HVAC vent relocation
- Permit or inspection costs in some areas
- Professional design or drafting help
A good contractor should talk through these items before work starts. If the quote only says “install ceiling detail” with no breakdown, ask for more detail.
DIY vs Professional Installation
A confident DIYer can install a basic applied trim grid in a small, square room. Still, ceilings expose crooked cuts quickly, so patience matters.
DIY may make sense when the room is simple, the trim is lightweight, no electrical work is needed, and the existing ceiling is flat. Professional installation is smarter for large rooms, open-plan layouts, recessed lighting changes, stained wood, damaged ceilings, or grids that must align with cabinets, fireplaces, and built-ins.
The hardest part is not always building the grid. It is making the layout feel inevitable, as if it was always part of the house.
Common Mistakes to Avoid
A beautiful ceiling can turn disappointing when one detail is ignored. These are the mistakes that show up most often.
Making the Beams Too Deep
Deep beams can look impressive in photos, but they need height. In a standard-height room, they may make the ceiling feel lower.
For this design, shallow is usually safer. You still get shadow and structure, but the room keeps its air.
Ignoring the Light Fixtures
Lights should be planned with the grid. A recessed light that lands too close to a beam can cast awkward shadows.
Before installation, mark beam lines with painter’s tape on the ceiling. Then stand in the room and imagine where each light will fall.
Using Too Many Small Panels
A busy grid can make a ceiling feel restless. This is especially true in bedrooms and small living rooms.
Fewer, larger panels often look more expensive than many tiny ones.
Choosing Heavy Contrast Too Quickly
Dark beams on a white ceiling can be dramatic. They can also feel harsh, especially in rooms with low ceilings or lots of furniture.
If you want contrast, test it with samples first. Look at the color during morning, afternoon, and evening light.
Forgetting the Edges
The grid needs a clean ending. Where it meets walls, crown molding, cabinets, or openings, the layout should feel deliberate.
Awkward edge panels are one of the easiest ways to spot a rushed design.
Maintenance and Long-Term Value
Ceiling trim collects dust, especially on horizontal ledges. A flatter design has fewer deep edges, so it is easier to maintain than a heavy traditional coffer.
Use a microfiber duster or vacuum brush attachment every few weeks. In kitchens, wipe painted beams with a slightly damp cloth when needed, especially near cooking areas.
Paint touch-ups may be needed over time. Keep the paint color, sheen, and brand written down. Ceiling whites can look similar in the can but very different once applied.
A well-designed ceiling can also help a home feel more custom. Better Homes & Gardens notes that coffered ceilings are often associated with added aesthetic appeal and a stronger sense of dimension in a room.
That does not mean every project guarantees a resale return. Buyers respond best when the design feels timeless, proportionate, and consistent with the rest of the home.
Room Size Ideas for a Cleaner Ceiling Layout
Room size changes the right approach. A ceiling that looks lovely in a large dining room may overwhelm a compact bedroom.
Small Rooms
Use shallow trim, wider panels, and one paint color. Keep lighting simple. The goal is to add charm without making the room feel boxed in.
A small room can still feel special if the ceiling lines are clean. Picture a 10-by-12 bedroom with four large panels, soft white paint, and one centered pendant. That is enough.
Medium Rooms
Medium rooms give you more freedom. You can use six to nine panels, depending on shape. This is the sweet spot for many homes.
A medium living room might use a 3-by-3 grid with recessed lights in the corner panels and a central fixture. The room feels organized but not stiff.
Large Rooms
Large rooms need scale. Tiny trim will disappear, while too many panels can look busy. Use broader beams or larger panels to match the room.
In an open-plan living and dining area, the ceiling can help define zones. One grid over the dining table and a related but wider grid over the sitting area can make the open space feel more thoughtful.
Color Choices That Make the Ceiling Feel Right
Color changes the personality of the ceiling more than most people expect. All white is clean, safe, and timeless, especially for low ceilings, small rooms, and modern interiors. Soft contrast, such as warm white beams with pale greige panels, creates depth without drama.
Natural wood can feel warm and expensive when it relates to floors, cabinetry, or furniture. Dark ceiling panels can be stunning in libraries, formal dining rooms, and media rooms, but they need strong lighting and a controlled palette.
| Color Direction | Best Use | Watch Out For |
|---|---|---|
| All white | Low ceilings and clean modern rooms | Can look plain without good trim lines |
| Soft contrast | Bedrooms, dining rooms, transitional spaces | Needs careful undertone matching |
| Natural wood | Warm interiors with wood floors or cabinetry | Mismatched stains can feel patchy |
| Dark panels | Libraries, media rooms, formal dining rooms | Can make a room feel smaller |
Image 2: Dining room with a centered chandelier, white shallow coffered ceiling grid, pale beige walls, wood table, and warm evening lighting.
How to Plan the Layout Before You Build
The planning stage should feel slow. That is a good thing. It is much cheaper to adjust lines before installation.
Step 1: Measure the Finished Room
Measure wall to wall in several places. Older homes are rarely perfectly square. Even new homes can have small differences.
Use the smallest measurement when planning so the layout does not run short at one end.
Step 2: Mark the Ceiling
Use painter’s tape to mark the beam locations. This simple step can reveal problems quickly.
Stand at the room entrance, sit on the sofa, and look from the main walking path. The ceiling should feel balanced from the places people actually use.
Step 3: Check Fixture Locations
Mark existing lights, fans, vents, smoke detectors, sprinklers, and speakers. These items often decide whether a grid is realistic.
Sometimes moving one light makes the whole design better. Other times, the grid should adapt to avoid expensive electrical work.
Step 4: Choose Beam Width and Depth
Do not choose beam size from a photo alone. A 6-inch beam can look modest in a large room and bulky in a small one.
Mock up the width with tape. For depth, hold a scrap board or sample trim near the ceiling if possible.
Step 5: Review the Edges
Check how the grid ends at each wall. Edge panels should not look accidental.
If the math creates tiny leftover strips, adjust the panel count or beam width.
When This Ceiling Is Not the Best Choice
It is tempting to add beautiful trim everywhere, but restraint matters.
Skip or simplify the idea when:
- The ceiling is already very low
- The room has too many bulkheads
- The budget cannot include proper finishing
- The ceiling has severe waves or damage
- The room style is intentionally plain and minimal
- You plan to move soon and need a quick, low-risk update
In these cases, you might get a better result from crown molding, a fresh paint color, better lighting, or a simple ceiling medallion.
Coffered Ceiling vs Tray Ceiling vs Beam Ceiling
These ceiling styles can overlap, but they are not the same.
| Ceiling Type | What It Looks Like | Best For |
|---|---|---|
| Coffered ceiling | Repeated recessed panels in a grid | Formal or tailored rooms |
| Tray ceiling | One raised or recessed center area | Bedrooms and dining rooms |
| Beam ceiling | Exposed or decorative beams without full panels | Rustic, farmhouse, or open rooms |
| Shallow coffered ceiling | Shallow grid with minimal drop | Modern homes and standard heights |
This shallow version gives you the rhythm of coffers without the heavy depth. That is why it suits so many updated interiors.
FAQs
Is a flat coffered ceiling good for low ceilings?
Yes, it can be, but only if the beams are shallow and the color contrast is low. In rooms that already feel cramped, use thin trim and paint everything the same color.
What is the best room for this ceiling style?
Dining rooms and living rooms are usually the best starting points. They have strong furniture layouts, central lighting, and enough visual importance to justify the detail.
Does this ceiling make a room look smaller?
It can if the beams are too deep, too dark, or too busy. A shallow layout with larger panels can actually make a ceiling feel more designed and visually orderly.
How much does installation cost?
Costs vary by location, material, room size, and lighting changes. Published home-improvement guides commonly place many coffered ceiling projects in the low thousands, with per-square-foot estimates varying by source and project complexity.
Can I install it myself?
A basic applied trim design may be possible for an experienced DIYer. If the project includes electrical work, heavy beams, old ceiling damage, or complex alignment, hiring a professional is safer.
What color should I paint the ceiling?
For most homes, the safest choice is one soft white or warm neutral across both beams and panels. Use contrast only when the room has enough height, light, and visual balance.
Are coffered ceilings outdated?
No. Heavy, ornate versions can feel dated in some homes, but cleaner shallow designs still feel current. The finish and proportion matter more than the ceiling type itself.
Can this ceiling work with recessed lights?
Yes. Recessed lights work well when they are planned inside the panel layout. Avoid placing lights too close to beam edges because shadows can look uneven.
Is this design worth the money?
It can be worth it when the room is important, the proportions are right, and the finish matches the home. It is less worthwhile when the ceiling is low, damaged, or not aligned with the room’s style.
Conclusion
This ceiling detail is one of those updates that can quietly change the whole mood of a room. It adds rhythm, depth, and a custom feeling without needing loud colors or oversized décor.
The best results come from restraint. Keep the profile shallow, align the grid with the room, plan the lighting early, and choose materials that match the rest of the home. When those pieces work together, the ceiling stops being an empty surface and becomes part of the room’s personality.
If you want a ceiling that feels polished but still calm, this style is worth serious thought. Done well, it brings just enough architecture to make a room feel warm, finished, and beautifully considered.